Chatterbox Quilts' Blog - Chatterbox Quilts

Build your free motion quilting confidence!

Janome

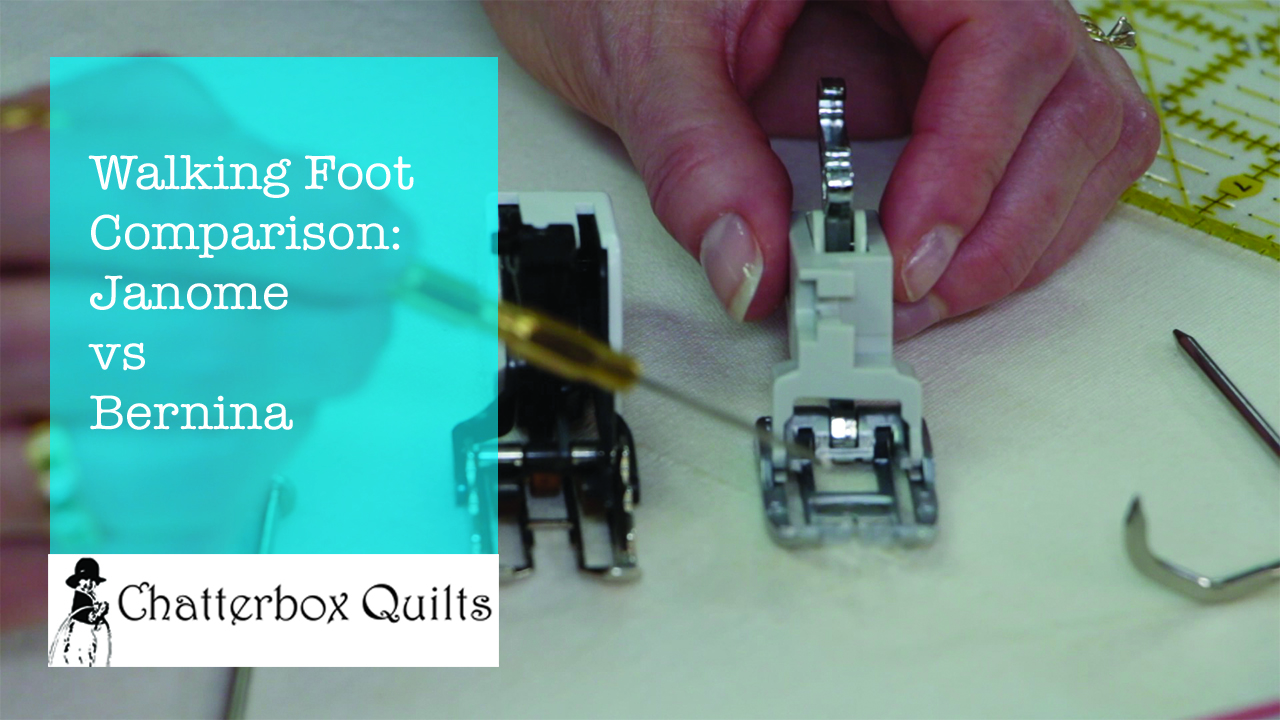
Walking Foot Comparison: Janome vs Bernina

One of the sewing machine feet that I absolutely have to have is the walking foot. Some people call this a dual fee foot or an even feed foot, but I always use the term "walking foot". 

What is a walking foot and why do I believe it is so important? The walking foot works with the feed dogs to move the top fabric along at the same rate as the bottom fabric. This helps to avoid a situation where the top fabric is being moved along at a quicker rate than the fabric you are sewing it to (the bottom fabric). 

When do I use the walking foot? I use it when I'm stitching borders to the sides of my quilt top. I also use it for quilting. I use it to stitch binding on to my quilt. See? The walking foot has lots of uses!

Some walking feet come with the sewing machine when you purchase it while others are an additional cost. I strongly recommend that you purchase a walking foot if one didn't come with your machine. It is a foot that you will use over and over again.

You will find marks on some walking feet that indicate the 1/4" mark or 1/2" mark. This can be very helpful when you want to stitch a 1/4" seam. It's also helpful when you want to stitch a 1/4" or a 1/2" away from a previously stitched line.

As I have both a Bernina sewing machine and a Janome one, I was able to show you the difference between their walking feet.  The video below or on my YouTube channel shows you these differences.

If you have a walking foot for your sewing machine, take a closer look at it. Does it have markings to indicate a 1/4" or other measurements on it? Leave me a Comment below to tell me about your sewing machine's walking foot and how you like to use it.

Creatively,

Kim's signature small aqua.jpg
 

P.S. Did you know that Chatterbox Quilts provides FREE content to those on our mailing list? Yes, we do! Sign up here to receive FREE content directly in your email inbox every few weeks from Chatterbox Quilts. You'll be glad you did :)

How to Get an Accurate 1/4" Seam Allowance on the Janome 9400

What do quilters strive to achieve in their quilting? Besides perfection, of course! An accurate 1/4" seam allowance. I've heard so many quilters say that they struggle to get that perfect 1/4" seam allowance that makes all the difference in their quilts.

 
Janome 9400.jpg
 

My Janome Horizon Memory Craft 9400 QCP (Janome 9400) includes a new needle plate and foot that makes getting an accurate 1/4" seam allowance a piece of cake! 

 
HP Needle Plate that comes with the Janome 9400

HP Needle Plate that comes with the Janome 9400


The HP needle plate and foot work together to stitch a perfect 1/4" seam. These two can only be used when straight stitching and once you pop in the HP needle plate, the Janome 9400 automatically recognizes the stitch choices that can be used with this needle plate.

 
HP foot on the Janome Horizon Memory Craft 9400 QCP

HP foot on the Janome Horizon Memory Craft 9400 QCP


I so appreciate this feature of the machine as it prevents me from using a stitch that would cause the needle to strike the needle plate and break and perhaps damage my sewing machine.

 
Janome 1/4 inch seam foot O

Janome 1/4 inch seam foot O


The Janome 9400 still comes with the 1/4 inch seam foot O too: this is the one that has the fabric guide along the side, if you prefer to use it, but I must say, that my go to combination when piecing is now the HP needle plate and foot.

Watch the video below or on my YouTube channel to see the options available when you want to stitch a 1/4" seam.

If you would like more information on the Janome Horizon Memory Craft 9400 QCP, you can find videos on it in this playlist.

Does your sewing machine have a 1/4" foot that allows you to stitch a perfect 1/4" seam? Leave me a Comment below to tell me how you achieve an accurate 1/4" seam when you are piecing.

Creatively,

Kim's signature small aqua.jpg
 

P.S. Did you know that Chatterbox Quilts provides FREE content to those on our mailing list? Yes, we do! Sign up here to receive FREE content directly in your email inbox every few weeks from Chatterbox Quilts. You'll be glad you did :)

Decorative Stitches on the Janome 9400

Almost every sewing machine that you can buy has decorative stitches on it. Some have only a few of these stitches on them while other sewing machines have lots of them. The Janome Horizon Memory Craft 9400 QCP has hundreds of decorative stitches on it and the ability to create more of these by not only altering the length and/or width of the stitches, but also by flipping them horizontally and/or vertically. 

There are so many decorative stitches on the Janome 9400, that it could be quite confusing, but it's not since the stitches are arranged into categories, such as Appliqué, Heirloom, Utility and so on. This categorization makes it quite simple to find a stitch the will suit your purpose. 

Watch the video below or on my YouTube channel to learn all about selecting and altering the stitches on the Janome 9400.

Do you use decorative stitches in your sewing or quilting projects? Leave a comment below to let me know how you use these types of stitches in your projects.

Creatively,

Kim's signature small aqua.jpg
 

P.S. Did you know that Chatterbox Quilts provides FREE content to those on our mailing list? Yes, we do! Sign up here to receive FREE content directly in your email inbox every few weeks from Chatterbox Quilts. You'll be glad you did :)

Hand Embroidery to Machine Embroidery with the Janome 500E

One of the things I enjoy doing with my Janome 500E is to convert some of my original hand embroidery designs into machine embroidery. I thought that one of my patterns, Snowflake Brrr! would be perfect to turn into a machine embroidered wall hanging and I knew that this would be so easy with my Janome 500E.

Snowflake Brrr close up.jpg

The original Snowflake Brrr! design was created using simple hand embroidery stitches (the FREE design can be found on my Craftsy store). I wanted to translate this look into machine embroidery and used the Creative Drawings software that came with my Janome Artistic Edge to translate my hand embroidery svg file into a .JEF format for the Janome 500E, choosing decorative stitches in the place of the hand embroidered ones. I had lots of fun playing around with all of the stitch choices available and could've spent hours (more than I already had!) doing this, but I eventually settled on the ones you see in the photo above for Snowflake Brrr! 2.0. I transferred the design to a USB stick and plugged it into the Janome 500E, so it would be ready for stitching.

Once I had chosen the stitches, it was time to decide on threads. I chose three different thread colours: a glittery light turquoise blue, a medium blue and a dark navy. Now it was time to prep my fabric and get stitching!

Snowflake Brrr threads.jpg

I used a tear away stabilizer underneath my fabric. I always do a test stitch out first and for this first stitching I used only one layer of stabilizer. My stitching results weren't bad, but there was some puckering around the "Brrr" in the design. For my "real" project, I added an additional layer of stabilizer and the results were perfect. I used a 10" square of white tone on tone fabric for my background.

2 Snowflake Brrr fabric in hoop.jpg

Once I had my two layers of stabilizer underneath my fabric, I hooped everything in to the SQ20b hoop that came with my Janome 500E. I was now set to start stitching.

5 Snowflake Brrr stitching.jpg

I was really pleased by the contrast between the different thread colours. Initially I had chosen a single running stitch for the "veins" on the snowflakes, but again, in my first stitch out, I didn't feel that they were thick enough. I chose a thicker running stitch and was glad I did as the snowflakes now appeared more balanced.

7 Snowflake Brrr in hoop.jpg

When my Janome 500E had finished its job, I removed the hoop from the machine and took a minute to admire the results. 

8 Snowflake Brrr cut loops.jpg

There were a few connecting stitches between parts of the snowflakes, so I trimmed these off before I removed the project from the hoop. I found it easier to do this as the fabric was taut and this made it easier to trim off these threads.

9 Snowflake Brrr out of hoop.jpg

Next step was to remove the embroidered Snowflake Brrr! 2.0 from the hoop. This is such an easy step ;)

11 Snowflake Brrr embroidery back.jpg

Just in case you were wondering what the back of the project looked like - here it is! Notice the bit of a thread nest on part of the "Brrr". While this can be seen on the back, there is no indication on the front that this occurred. I think that part of the thread might have separated and gotten pulled to the back, but as long as the front looks good, this isn't a problem.

10 Snowflake Brrr Trimming.jpg

After the embroidery sandwich (my new technical term for the fabric and stabilizer) was removed from the hoop, it was time to trim it up to the desired size. In the case of this project, I wanted a 9 1/2" square. I tore away the stabilizer and was now ready to add some borders.

12 Snowflake Brrr with first border.jpg

Time for some borders! I added this pop of red batik around the embroidered fabric for my first border. It was 1 1/2" wide, which gave me a 1" finished border.

13 Snowflake Brrr with second border.jpg

I just happened to have some snowflake fabric that I knew would be perfect for this project. This second border was 2 1/2" wide to start, giving a second border finished width of 2".

14 Snowflake Brrr with hanging tabs.jpg

I love to use hanging tabs for my smaller wall hangings, so next I created these to add to Snowflake Brrr! 2.0. I also like to avoid binding by using a pillowcase method for small projects, so I needed to insert the hanging tabs into the project  before I stitched it all around. I layered my hanging tabs, with the raw edges matching the raw edge of the quilt top, then my quilt top and batting. Once these were all together, I put the backing, right side down, on the top of the above layers. I stitched all around the quilt sandwich with a ¼" seam, leaving a 3" - 4" opening to turn the project right side out.

15 Snowflake Brrr Pillowcase.jpg

I clipped the corners to reduce bulk and turned the project right side out. It can be a bit of a slow process, but persistence pays off and once Snowflake Brrr! 2.0 was turned right side out, all I had to do was hand stitch the opening closed before the project was ready for quilting.

I always want to know how people quilt their projects and hate the term "quilt as desired", so I won't leave you wondering how I quilted Snowflake Brrr! 2.0. I stitched in the ditch between the background and first border and between borders one and two and then added some swirls and loops in the background around the snowflakes. Pretty simple, but I wanted to be sure that the quilting didn't detract from the beautiful machine embroidery.

16 Snowflake Brrr Final.jpg

While I really liked the original Snowflake Brrr!, version 2.0 was much quicker to create and now that I have created the .JEF file, I can always stitch it out if I want to create another project as a gift. And... if I'm feeling creative, I can always spend some time switching out decorative stitches for other ones to see how that would look. With the Janome 500E, the possibilities are endless!

Creatively,

Kim's signature small.jpg
 

P.S. Did you know that Chatterbox Quilts provides FREE content to those on our mailing list? Yes, we do! Sign up here to receive FREE content directly in your email inbox every few weeks from Chatterbox Quilts. You'll be glad you did :)


Sewing Help is Here with the Janome 9400

I'm not a sew-er, I'm a quilter. By this I mean that I don't sew garments. Yes, you may find me mending clothes or making home decor items occasionally, but garments - no, not my thing. (It was my thing when the kids were little and would wear pants with elastic waistbands, but those days are long gone!).

Having made this statement, I was intrigued by the Sewing Application area on the Janome Horizon Memory Craft 9400 QCP. What I found interesting about it is that it provides you with information on the best settings to use when doing various sewing-type stitching. For example, if I wanted to add a zipper to a project, the Janome 9400 would help me to do this by suggesting the stitch, foot and other settings to get the best results. 

In addition to common sewing applications, there are also areas for Quilting, Patchwork and Appliqué. While I think that I know the best settings for these types of stitching, it's nice to know that I can always default to the Janome 9400's knowledge to help me out.

Learn more about the Sewing Application on the Janome Horizon Memory Craft 9400 by watching the video below or on my YouTube channel.

I think the Sewing Application on the Janome 9400 would be very helpful for people who aren't familiar with various types of stitching and construction as it takes the wondering out of the equation: the Janome 9400 does all the thinking for you.

Are you a sew-er or a quilter, or both? Leave me a comment below to let me know what type of information you would find most helpful from your sewing machine.

Creatively,

Kim's signature small.jpg